Introduction
RAM, or random access memory, is a critical component of any laptop. It plays a vital role in improving the overall performance and multitasking ability of a laptop.
In simple terms,
the more RAM a laptop has, the more tasks it can handle simultaneously, resulting in improved performance and user experience.
If you’re feeling frustrated with your laptop’s slow performance, upgrading the laptop RAM may be the solution.
The purpose of this blog post is to provide a step-by-step guide to upgrade your laptop RAM.
We’ll cover everything from assessing your laptop’s RAM specifications to the upgrade process and troubleshooting common issues.
Whether you’re a seasoned DIYer or a beginner, this guide will help you boost your laptop’s performance with minimal effort.
Why Upgrade Your Laptop’s RAM?
If you’ve been experiencing slow performance on your laptop or notice that it takes longer to load certain programs and files, upgrading your laptop’s RAM can be a game-changer.
When your laptop runs out of available RAM, it will start using the hard drive as a backup storage, which can slow down your computer’s performance significantly.
By upgrading your laptop’s RAM, you can:
- Increase the speed and responsiveness of your laptop.
- Allow your laptop to handle more demanding programs and multitasking.
- Improve overall system stability and reduce crashes and freezes.
- Enhance your gaming experience and graphics processing capabilities.
- Future-proof your laptop for newer software and operating systems.
Upgrading your laptop’s RAM can be a cost-effective way to breathe new life into an older computer and improve your productivity and enjoyment.
So if you’re tired of waiting for your laptop to catch up with you, it’s time to consider upgrading your RAM.
Faster multitasking isn’t enough? Conquer both lag and low storage with a RAM upgrade & my killer hard drive upgrade guide. Double win!
How Much RAM Do You Need?
Determining how much RAM your laptop needs can be a bit tricky. It all depends on what you plan on using your laptop for.
| If you plan on using your laptop for | You need |
|---|---|
| Basic tasks such as web browsing, email, and word processing | At least 8GB RAM |
| More intensive tasks such as gaming, video editing, or running multiple applications at the same time | At least 16GB or more RAM |
Additionally, consider how long you plan on keeping your laptop.
If you plan on using it for several years,
it may be a good idea to opt for more RAM to future-proof your laptop and ensure it can handle new software updates and programs.
How to Determine If Your Laptop Can Be Upgraded
Upgrading your laptop’s RAM is a cost-effective way to improve its performance. But before you start shopping for RAM, you need to determine if your laptop can be upgraded.
You need to check and verify the following 3 things before upgrading. You cannot upgrade your laptop’s RAM:
- If your laptop has reached the maximum capacity for the memory you can upgrade.
- If you have no extra slot available.
- If your laptop has on-board memory as in the case of notebooks and slim laptops.
1. Checking the Maximum RAM Capacity
First of all, we are going to check how much RAM our laptop is running so that we can know if we already have reached the maximum capacity or not.
1.1 Checking Installed RAM Using Task Manager
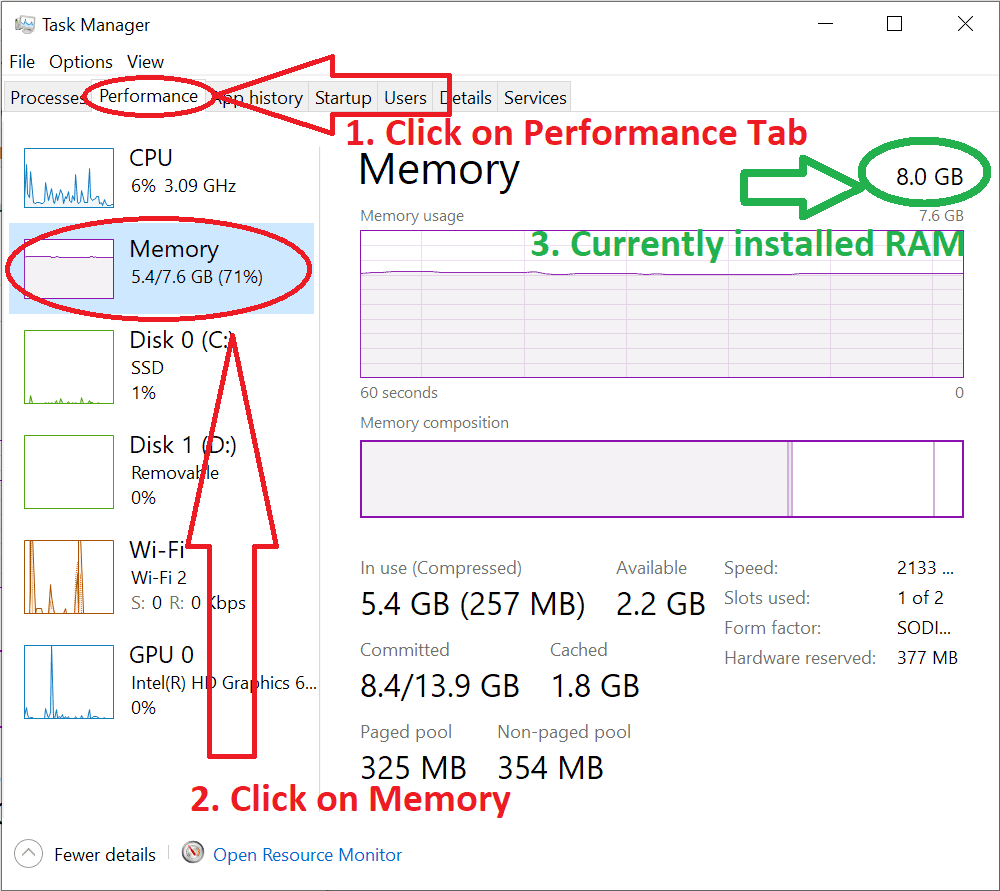
Step 1: Right-click on Taskbar and click on Task Manager or press Ctrl+Alt+Delete on your keyboard and select Task Manager. You will see the following screen.

Step 2: Click on the Performance Tab and then click on Memory. You will now see the RAM that your laptop is currently using. As you can see in the picture our installed laptop RAM is 8GB (highlighted in green).

1.2 Checking Installed RAM Using Windows Settings
If you are having a problem following the above method and you do not know your exact laptop model then you can follow this method to get information about maximum RAM capacity.
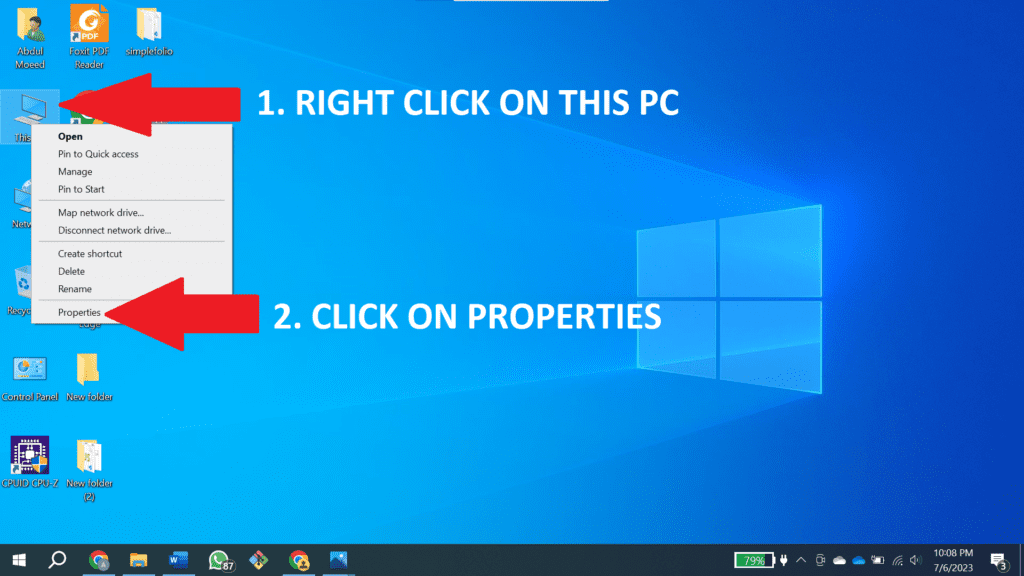
Step-1: Right-click on “This PC” on your desktop and select Properties. You will see Installed RAM in Device Specifications.

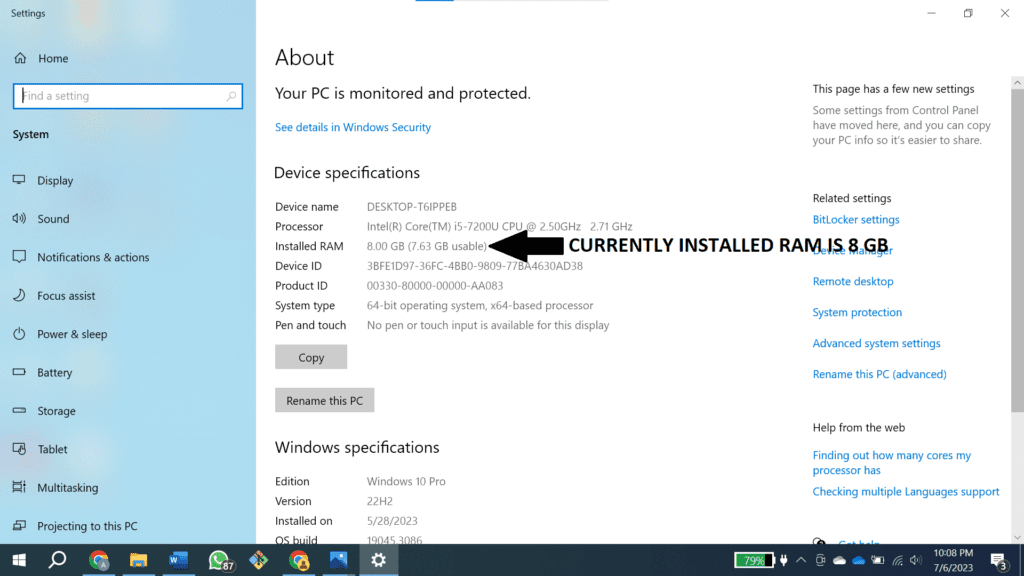

Now we know how much RAM is being installed on our laptops. Let’s continue further and now we will check the maximum RAM that our laptop can support.
1.3 Checking Maximum RAM Capacity Using CMD
Step 1: Press Window Key+R write cmd in the box and click on OK.


Step 2: Copy and paste the following command wmic memphysical get maxcapacity in the cmd and press Enter.
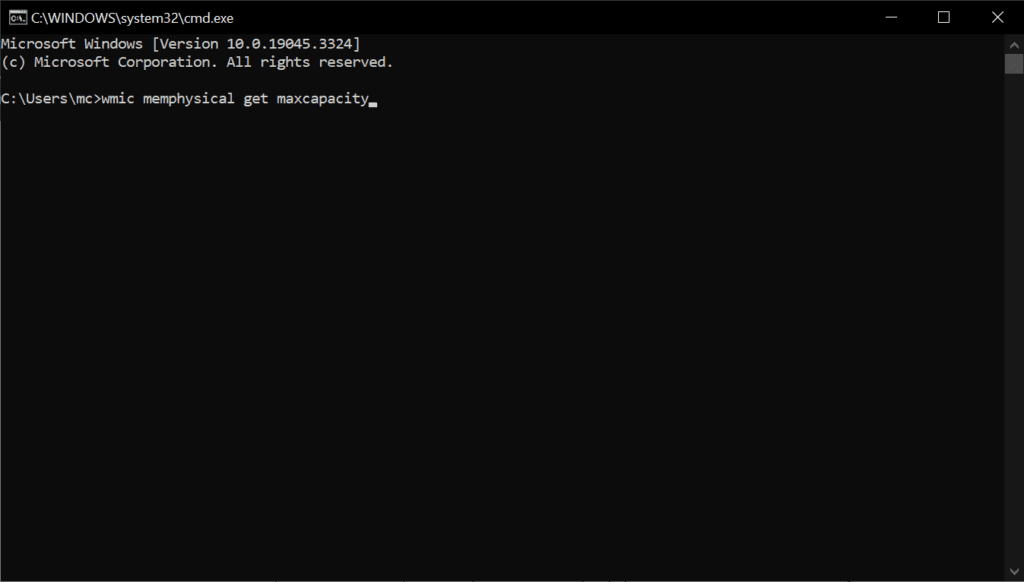

Step 3: You will get the maximum capacity in the form of some number.
It is the maximum capacity in KB (Kilo Bytes). You have to convert it into GB (Giga Bytes) by dividing that number by 1048576.
For example, in our case (Lenovo Thinkpad T470), as shown in the image we got the following number 33554432,
When we convert this number to GB we will get:
33554432/1048576 = 32 GB.
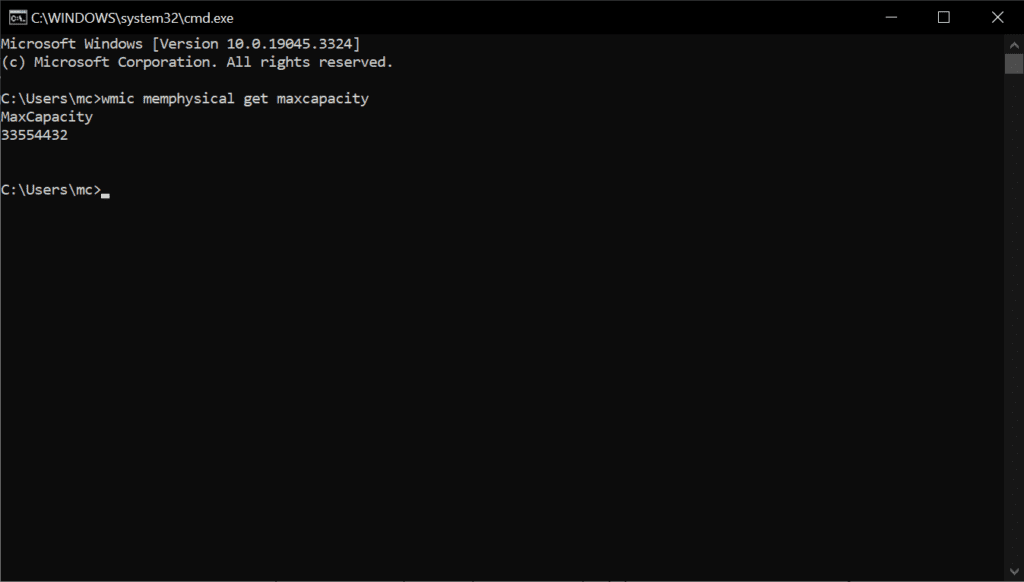

Step 4: Now we know that our maximum RAM capacity is 32 GB and our current RAM is 8 GB so
we can upgrade our RAM easily as we have not reached the maximum capacity yet.
If our current RAM was equal to maximum RAM capacity then we will not be able to upgrade the RAM.
1.4 Checking Maximum RAM Capacity using Crucial Advisor
Step 1: Go to the following website https://www.crucial.com/store/advisor. You will see the screen as shown in the picture below.


Step 2: First, select the manufacturer (in our case it is Lenovo).
Step 3: Select the product line (in our case it is the Thinkpad T series).
Step 4: At the last, select your laptop model (in our case it is T470).


Step 5: Click on Find My Computer. A new page will open where specifications related to your laptop will be displayed. Scroll down and you will see the maximum memory of your laptop.


2. Checking available RAM slots
2.1 Using Task Manager
One of the first things you need to know when considering a RAM upgrade is how many RAM slots your laptop has.
This information will help you determine how much RAM you can add and in what configuration.
Luckily, you can easily find this information using the task manager on your laptop. Here’s how to do it:
Step 1: Open the task manager by pressing Ctrl + Shift + Esc or by right-clicking on the taskbar and selecting “Task Manager.”
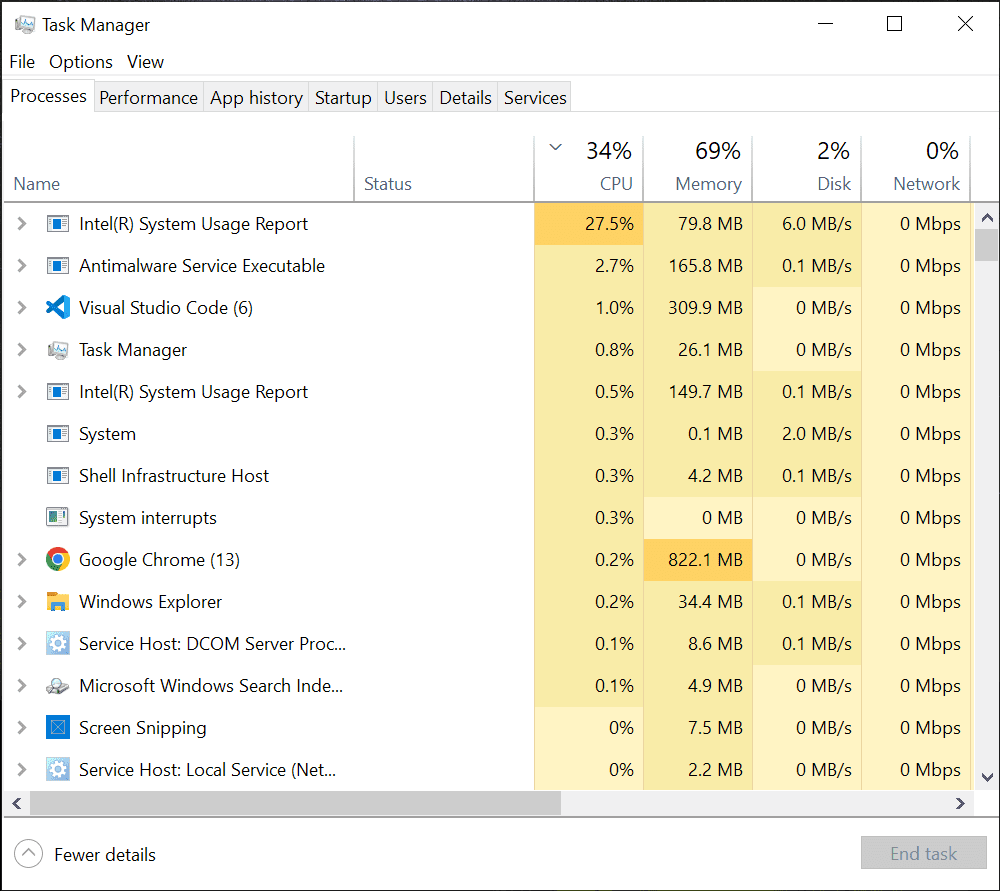

Step 2: Click on the “Performance” tab in the task manager window.
Step 3: Look for the “Memory” section. Here, you’ll see the total amount of RAM installed on your laptop and the number of slots in use.
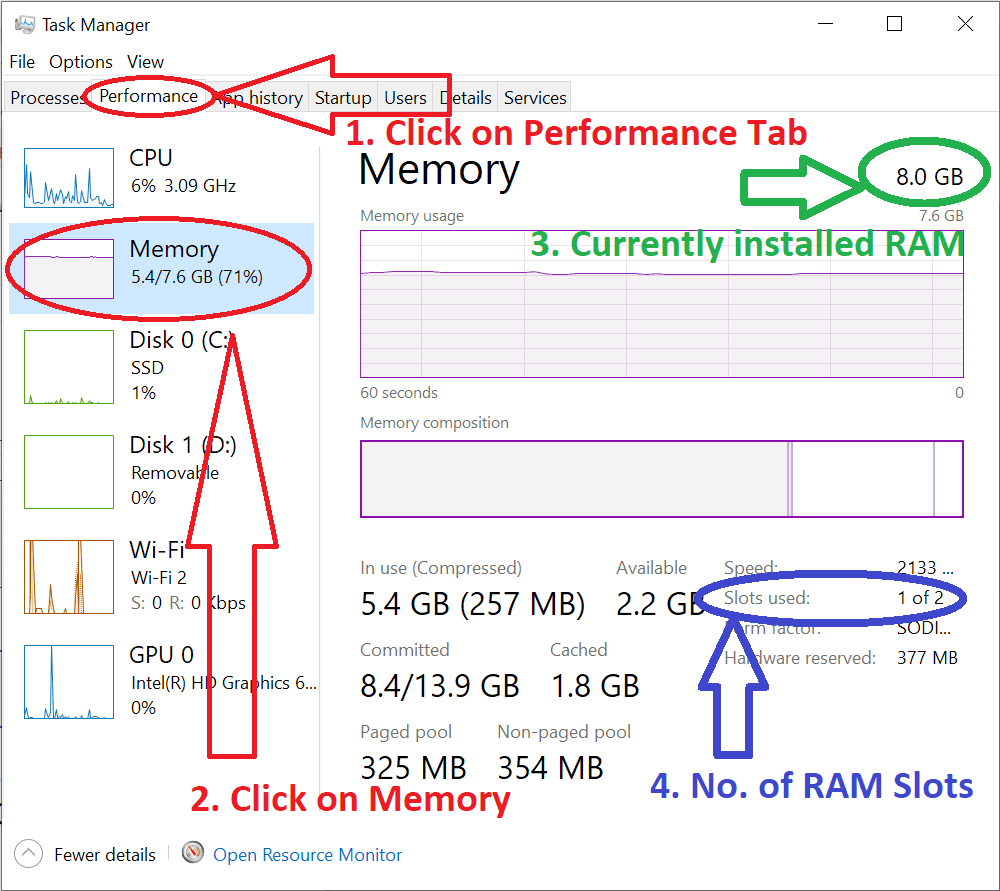

If you see two slots and only one is in use, it means you have an available slot to add more RAM.
As you can see in the above picture in our case we have two RAM slots and currently only one RAM slot is in use and the other one is available for us to use.
By checking the available RAM slots using the task manager, you can easily determine if your laptop has the potential to handle a RAM upgrade.
Once you know this information, you can move on to the next step of figuring out how to upgrade your RAM.
2.2 Using the CPU-z tool
To check the available RAM slots on your laptop using the CPU-z tool, follow these simple steps:
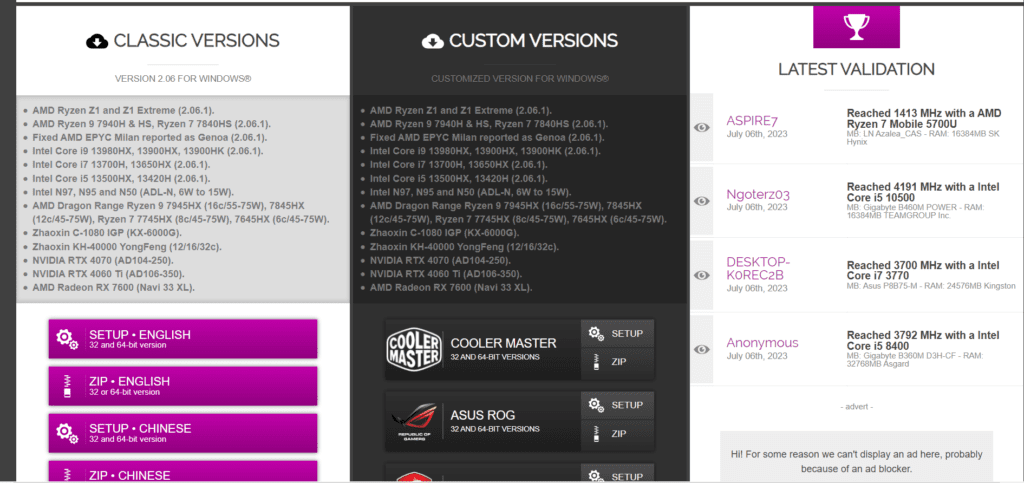
1. First, go to the following link https://www.cpuid.com/softwares/cpu-z.html to download CPU-Z and make sure you have downloaded and installed the CPU-z software on your laptop.

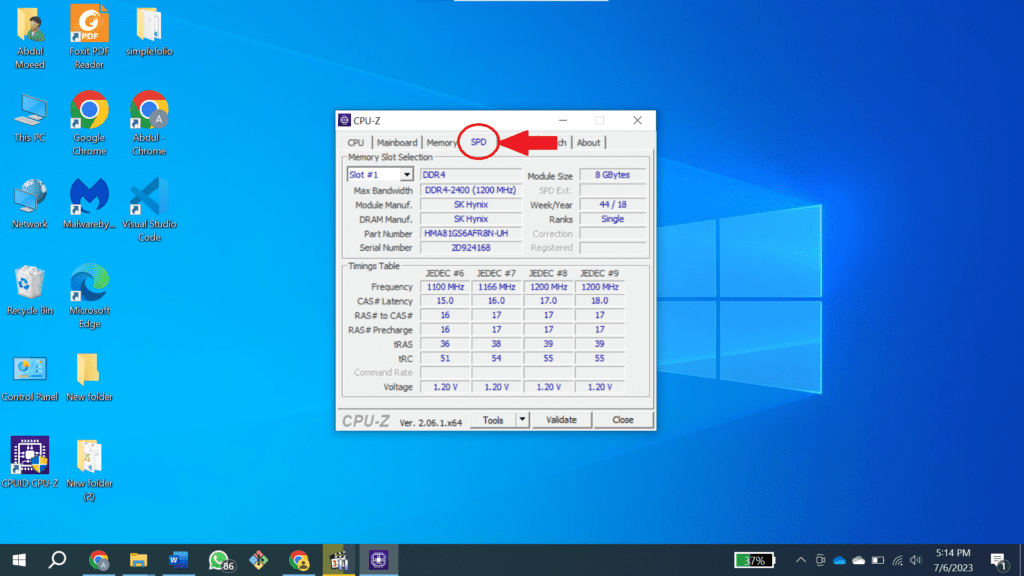
2. Once you have the software open, look for the “SPD” section, which stands for Serial Presence Detect.
This section contains information about each RAM module, including the number of slots available.


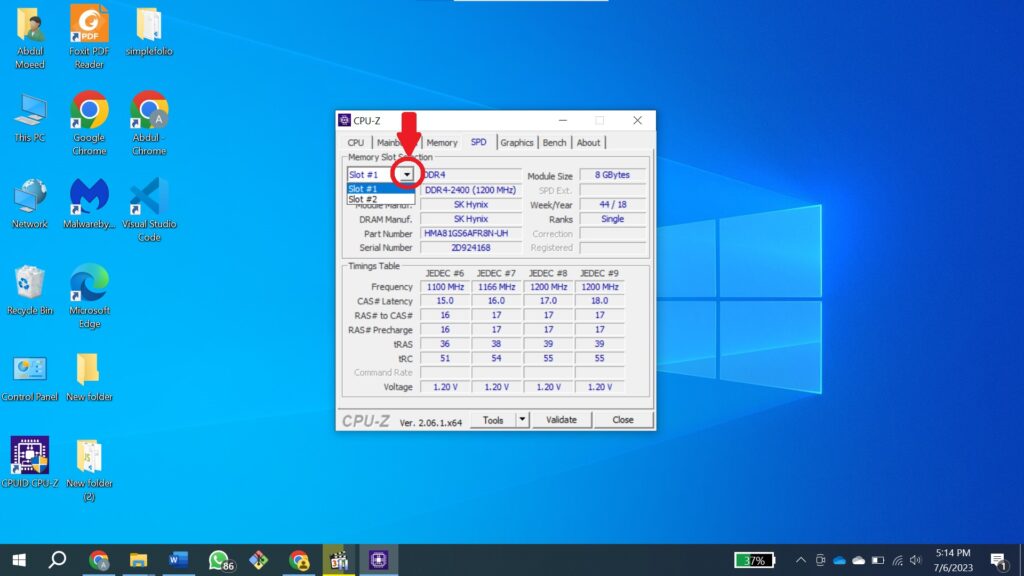
3. In the “SPD” section, you’ll see a dropdown menu that lists each RAM module.
Click on each module to see its specific details, including the number of slots in use and the number of available slots.

By following these steps, you can easily determine how many RAM slots your laptop has and whether you have the potential to add more RAM.
This information is crucial when considering how to upgrade your RAM and maximize your laptop’s performance.
So, don’t wait any longer – take the time to check your available RAM slots using the CPU-z tool and get ready to upgrade your RAM!
3. Checking if RAM is soldered or not Using the Kingston online tool
When it comes to upgrading your laptop’s RAM, one of the first things you need to determine is whether your existing RAM is soldered or not.
Soldered RAM refers to memory that is permanently attached to the motherboard and cannot be removed or upgraded.
On the other hand, non-soldered RAM is easily replaceable and can be upgraded to improve your laptop’s performance.
So how do you find out if your laptop’s RAM is soldered or not?
Enter the Kingston online tool. Kingston is a well-known and trusted brand in the world of computer memory, and they have a user-friendly tool on their website that can help you determine if your laptop’s RAM is soldered or not.
1. To get started, go to the Kingston memory search tool by visiting this link https://www.kingston.com/en/configurator.
This tool allows you to select your laptop brand, model, and specific configuration to find compatible RAM upgrades.
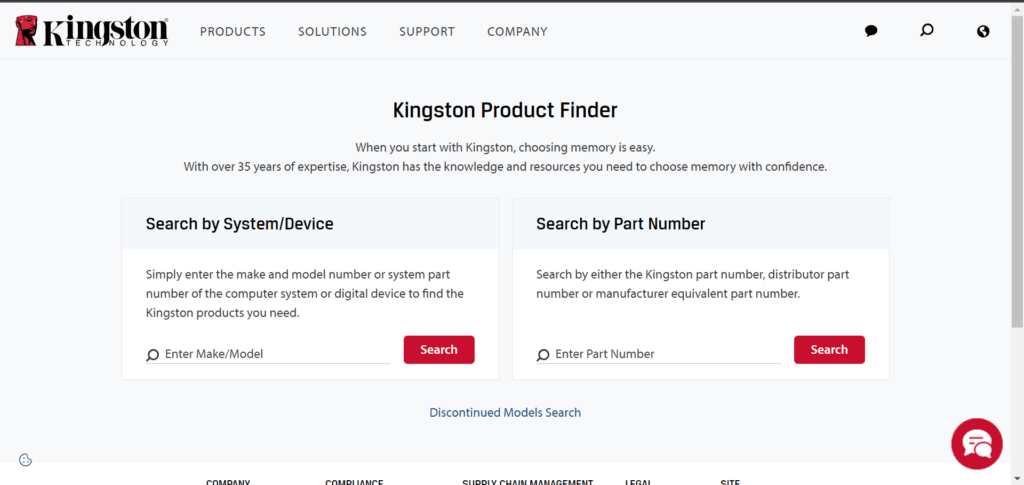

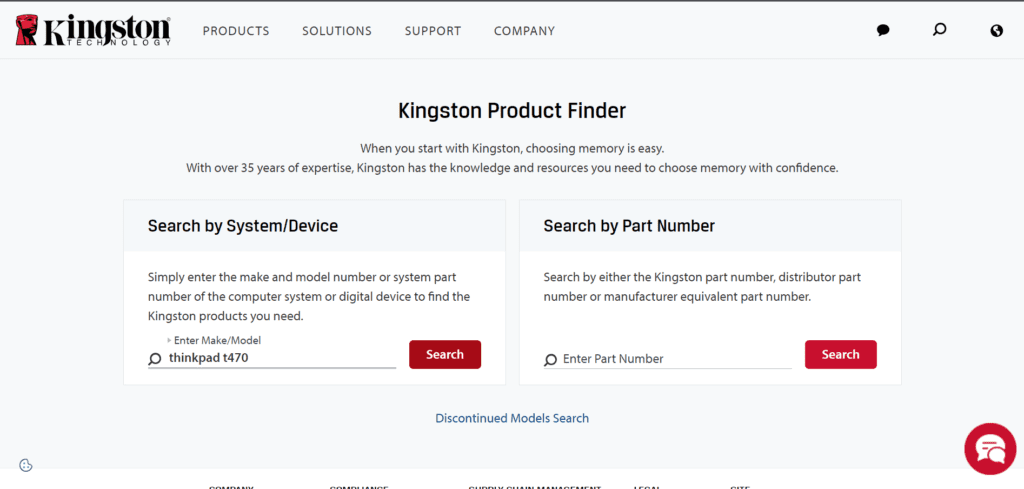
2. Enter your laptop model in the left box titled “Search by System/Device” and click on Search, in our case it is ThinkPad t470.

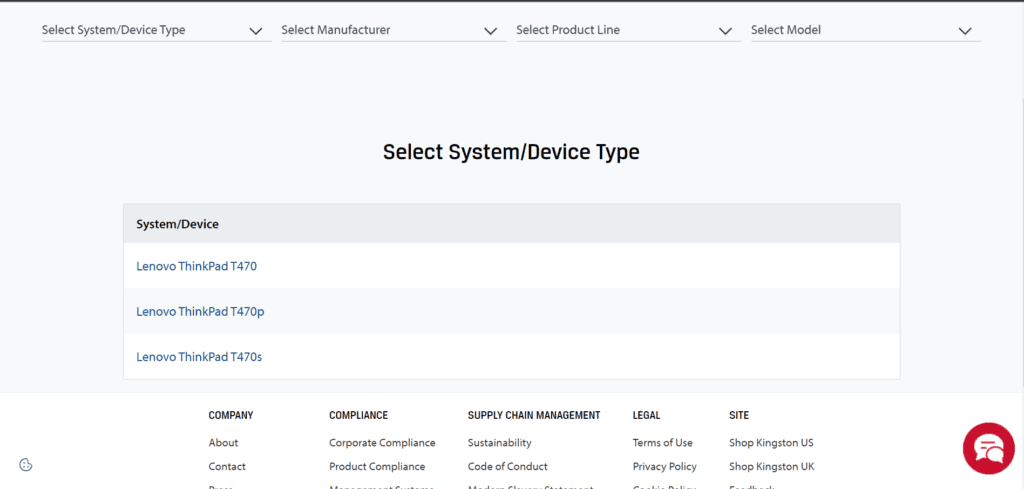
3. Scroll down a little and you will see different models of your laptop, select the correct model. In our case, it is the Lenovo Thinkpad T470.

4. Once you have selected your laptop model, scroll down to the “System Information” section, where you will find information about your laptop’s RAM.
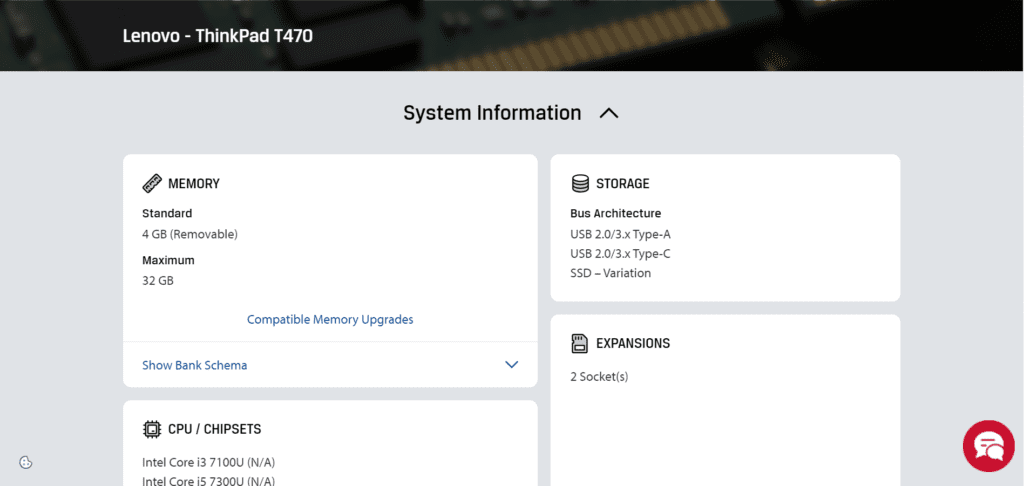

5. If the information mentions that the RAM is “soldered” or “non-replaceable,”
then, unfortunately,
your laptop’s RAM is soldered to the motherboard and cannot be upgraded.
However, if the notes indicate that the RAM is “removable” or “upgradeable,” then you’re in luck!
You can easily upgrade your laptop’s RAM to boost its performance. Fortunately for our laptop Lenovo Thinkpad t470, the RAM is removable as you can see in the above image.
Using the Kingston online tool is a quick and reliable way to determine if your laptop’s RAM is soldered or not.
It takes the guesswork out of the equation and ensures that you are purchasing the right type of RAM for your specific laptop model.
So before you start shopping for RAM upgrades, make sure to check if your laptop’s RAM is soldered or not using the Kingston online tool.
Purchasing the Right Type of RAM
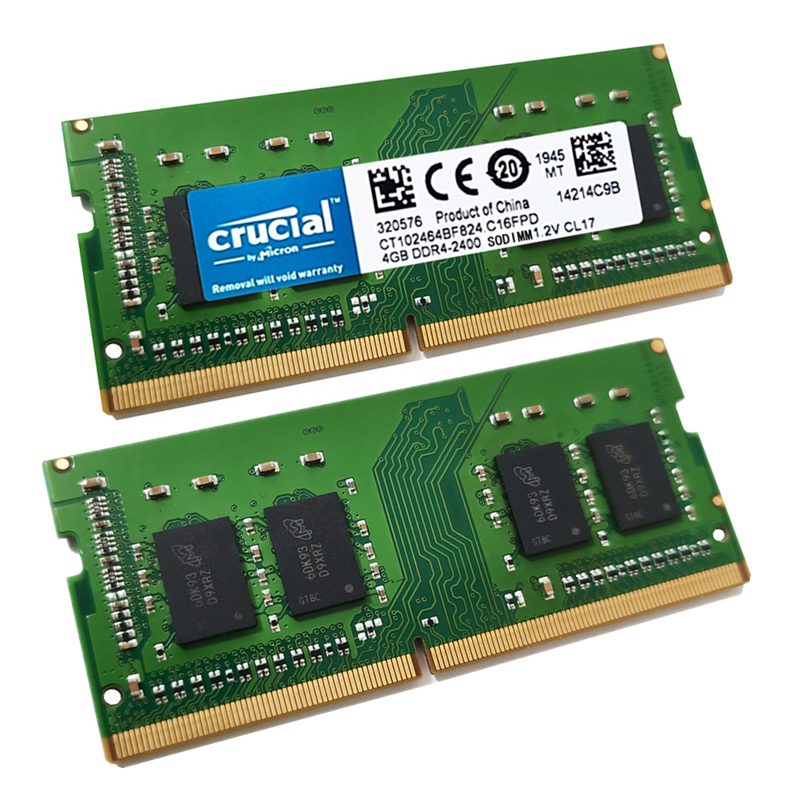

Before you buy a new RAM, it is important to make sure that you get the right type of RAM that is compatible with your laptop.
Otherwise, you might end up wasting your money on RAM that you cannot use.
To determine the type of RAM that your laptop uses, you need to know a few things so you know that you are buying compatible RAM for your laptop.
Once you know what these things are we will then discuss how you can determine these specifications for your current laptop RAM.
1. Desktop vs Laptop RAM
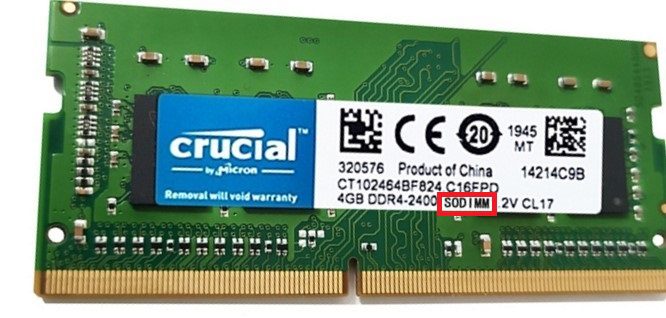

When searching online you will encounter RAM for desktops as well as for laptops however keep in mind that desktop RAM is different from laptop RAM and you cannot insert laptop RAM into a desktop and vice versa.
So how do you know the RAM you purchase is for a laptop, not a Desktop?
Well, there are two ways to check. First of all, inspect the title of the product, often product managers mention the word desktop or laptop in the title.
The second way to check is to find the word “SO-DIMM” in the title because laptop RAM is called SO-DIMM RAM to differentiate it from Desktop RAM.
The third way to check is through the images of the RAM, usually Desktop RAM is longer and bigger while laptop RAM is smaller.
2. Type of RAM
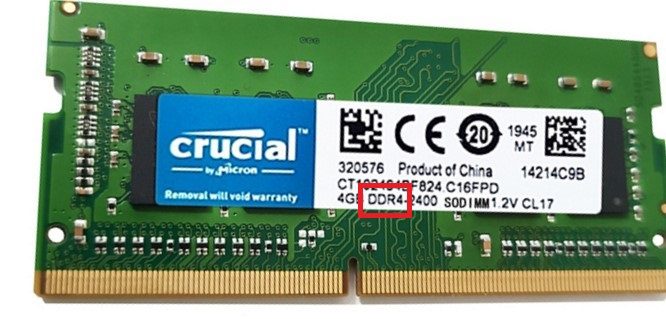

The most common types of RAM available are DDR3, DDR4, and DDR5.
DDR3 is the older generation, while DDR4 is the current standard and offers faster speeds and higher capacities.
DDR5 is the latest technology, but it is not yet widely available. Therefore, you need to make sure that you buy the type of RAM that is compatible with your laptop.
RAM Voltage
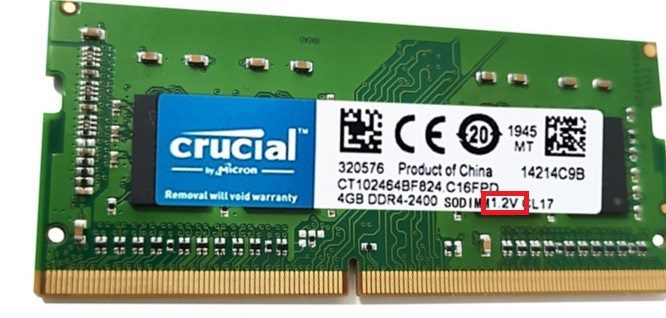

Apart from the type and capacity of RAM, it is also important to ensure that the voltage and frequency of the RAM are compatible with your laptop.
Most laptops use low-voltage (1.35V or 1.2V) RAM, so make sure to buy RAM with the correct voltage to avoid damaging your laptop.
Two types of RAM come on the market.
- Standard voltage (often operates at 1.5V or higher)
- Low voltage (typically operates at 1.35V or 1.2V)
RAM with low voltage has written a letter “L” on the label, such as DDR3L or DDR4L. The “L” letter indicates low-voltage RAM but it is not always the case.
RAM Speed or Frequency
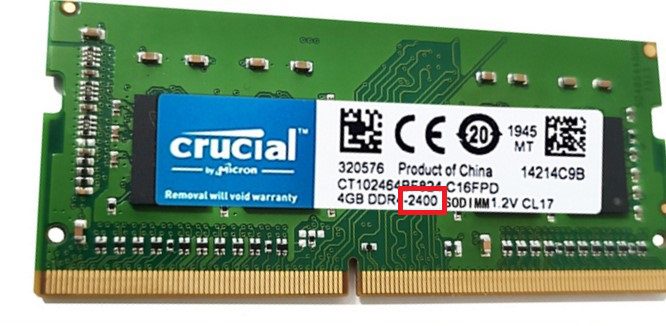

The frequency of the RAM also plays a crucial role in its performance.
Most laptops use DDR3 RAM with a frequency of 1333MHz or 1600MHz, while newer laptops use DDR4 RAM with a frequency of 2133MHz or higher.
However, it’s essential to note that some high-performance laptops may support even faster RAM speeds, such as 2400MHz, 2666MHz, or beyond.
Finally, consider buying your RAM from reputable brands and vendors to ensure the quality and compatibility of the RAM.
Some popular brands for laptop RAM include Kingston, Crucial, Corsair, and Samsung.
These brands are known for their reliability and performance, making them excellent choices for upgrading or replacing the RAM in your laptop.
To check the type of RAM, voltage, and frequency that your laptop supports, you can use a system information tool such as CPU-Z or Speccy.
Once you have this information, you can use it to buy the right type of RAM for your laptop.
Below you will find the steps on how to use CPU-Z to find your RAM specifications.
Step by Step guide To check the type of RAM, voltage, and frequency using CPU-Z software
To check the current laptop RAM voltage and speed, you can use a variety of software tools.
One popular option is CPU-z, which we mentioned earlier for checking the available RAM slots.
This handy tool not only provides information about the number of slots and type of RAM, but it also displays the voltage and speed of your RAM modules.
To find the current laptop RAM voltage and speed using CPU-z, simply follow these steps:
1. Open the CPU-z program on your laptop.
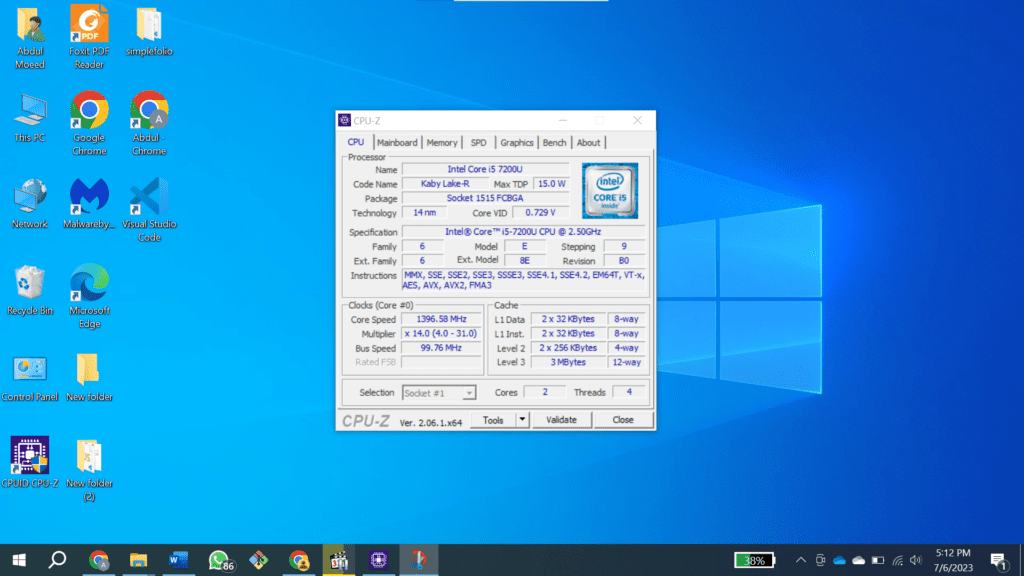

2. Look for the “SPD” section, which stands for Serial Presence Detect. This section contains information about each RAM module, including the voltage and speed.


3. In the “SPD” section, you’ll see a dropdown menu that lists each RAM module. Click on each module to see its specific voltage and speed details.
In our case we have only a single RAM module in slot # 1 hence we will look at the specifications for slot # 1 only.
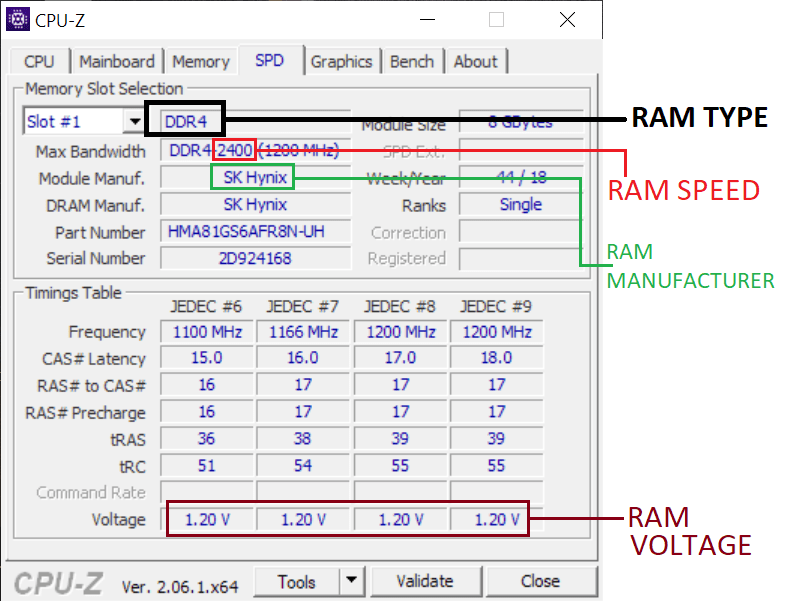

4. As you can see from the above image we can find the following information for our Lenovo Thinkpad t470 RAM module:
| RAM TYPE | DDR4 |
| RAM VOLTAGE | 1.2V |
| RAM MANUFACTURER | SK HYNIX |
| RAM SPEED/FREQUENCY | 2400MHz |
By checking the current laptop RAM voltage and speed, you’ll have a better understanding of the capabilities and limitations of your RAM modules.
This information is essential when upgrading your RAM because it allows you to choose new modules that are compatible with your laptop’s voltage and speed requirements.
When upgrading your RAM, it’s important to ensure that the voltage and speed of the new modules match the existing ones.
Mixing RAM modules with different voltage or speed specifications can lead to compatibility issues and may result in system instability or crashes.
So, take the time to double-check the voltage and speed details of your current RAM modules, and make sure to choose new compatible ones.
Now that you know how to check the current laptop RAM voltage and speed, you’re one step closer to upgrading your RAM and unleashing your laptop’s full potential.
With a little bit of research and some careful shopping, you can give your laptop a much-needed performance boost with a RAM upgrade.
Step-by-Step Process to Upgrade Laptop RAM
Tools and Equipment Required
Before we dive into the upgrade process, it’s important to have the right tools and equipment. Here’s what you’ll need:
- New RAM modules
- Anti-static wrist strap (optional)
- Screwdrivers
- Cleaning cloth
Safety Precautions to Keep in Mind
When upgrading your laptop RAM, it’s crucial to take some safety precautions to protect both you and your device. Here are some tips to keep in mind:
- Turn off your laptop and disconnect the laptop from all power sources.
- Ground yourself using an anti-static wrist strap. This helps prevent static electricity from damaging the delicate electronic components inside your laptop.
- Place your laptop on a flat, clean surface to prevent any accidental damage during the upgrade process.
- Handle the RAM modules carefully, as they are sensitive to static electricity.
Removing the Old RAM
Step 1
To remove the old RAM, you’ll need to locate it first.
On most laptops, the RAM is located in a compartment at the bottom of the device.
It’s usually easy to access by removing a few screws or clips.
Step 2
Once you’ve found the RAM compartment, gently push out the clips or pins that are holding the RAM in place.
The RAM should pop up at an angle, which will allow you to easily remove it. (See the video above for clarity)
Step 3
Be careful when handling the old RAM, as it is sensitive to static and physical damage. Store it in a safe and static-free location, or consider recycling it properly.
Step 4
If you’re upgrading both slots of RAM, repeat this process for the second slot.
Once you’ve removed all the old RAM, it’s time to install the new RAM and power on your laptop!
Installing the New RAM
Now that you’ve removed the old RAM, it’s time to install the new one. Make sure that you have the right RAM module by checking the label on the packaging.
Step 1
Open the packaging and remove the new RAM module carefully. Be sure to hold it by the edges to avoid any electrostatic damage.
Step 2
Locate the RAM slot on your laptop.
The RAM slot is usually located on the back of your laptop or under the keyboard.
Check your laptop manual if you’re not sure where it is.
Step 3
Align the notches on the RAM module with the slot and gently push it into the slot. The RAM module should fit in snugly, and the clips on the side of the slot should lock in place.
Step 4
Once the RAM module is in place, press down on the edges of the module until it clicks into place. Ensure that the module is firmly seated in the slot and the clips are locked.
Step 5
Finally, put the cover back on and screw it back into place. Replace the battery and turn on your laptop. Check the system properties again to confirm that your laptop is recognizing the new RAM module.
Congratulations! You have successfully installed the new RAM module on your laptop. Now it’s time to test the performance of your laptop with the upgraded RAM.
Tips and Tricks for a Smooth and Successful Upgrade
- Make sure you have the correct RAM type and speed for your laptop before purchasing the new modules.
- Check the maximum RAM capacity supported by your laptop before purchasing the new modules.
- If your laptop has two RAM slots, it’s recommended to purchase two modules of the same size and type to take advantage of dual-channel memory.
- Don’t force the RAM module into the slot, as this can damage both the module and the slot.
Verifying the Upgrade
Checking the New RAM Specifications
After the upgrade, it’s important to check that the new RAM modules have been recognized by the system. To do this, follow the steps outlined in the “Step by Step guide To check the type of RAM, voltage, and frequency using CPU-Z software” section. You should see the new RAM specifications listed, including the type, speed, total capacity, and number of slots.
Testing Your Laptop’s Performance with the Upgraded RAM
Now that you’ve successfully upgraded your laptop’s RAM, it’s time to test its performance to see if the upgrade was worth it.
Here’s how you can test your laptop’s performance with the upgraded RAM:
1. Run a System Scan
The first thing you should do after upgrading your RAM is to run a system scan.
This will allow you to check if your laptop recognizes the new RAM and if it’s running at the right speed.
You can run a system scan by going to the Task Manager and clicking on the Performance tab. This will give you an idea of how much RAM is being used by your laptop.
Another way to verify your new RAM is to use the built-in “Windows Memory Diagnostic” tool.
Just type window memory diagnostic in the search bar and select it from the results. Follow the on-screen instructions to perform a memory test.
2. Open Multiple Programs
Once you’ve confirmed that your laptop is recognizing the new RAM, you can test its performance by opening multiple programs at once.
This will give you an idea of how much faster your laptop can run with the new RAM. You can open several applications, such as a web browser, or video editing software, or even play a game to see how your laptop handles them.
3. Run Benchmarks
Another way to test your laptop’s performance with the upgraded RAM is by running benchmarks.
There are several benchmark tools available online that you can use to compare your laptop’s performance before and after the RAM upgrade.
Some popular benchmark tools include 3DMark and Geekbench. Run benchmark tests to measure various aspects of your system’s performance.
These tools will provide you with scores and comparisons to assess the impact of your RAM upgrade.
4. Check the boot time
Lastly, you can also test your laptop’s performance by checking the boot time.
To check your computer’s boot time, you can use a built-in timer or a third-party tool like “BootRacer” for Windows.
Restart your computer and start the timer as soon as you press the power button. Stop the timer when your system is fully loaded.
Upgrading your laptop’s RAM is an easy and affordable way to boost its performance.
By following these steps to test your laptop’s performance, you can confirm if the RAM upgrade was successful.
Remember to troubleshoot common issues that may arise after the upgrade and consult a professional if needed. Happy upgrading!
Troubleshooting Common Issues
Problems That May Arise During the Upgrade Process
1. Incorrectly installed RAM module
If you insert the RAM module incorrectly, it may not be recognized by the system.
2. Damaged RAM module
If the RAM module is damaged during the installation process, it won’t function correctly.
3. Incompatible RAM type or speed
If the new RAM module is not compatible with your laptop, it won’t be recognized by the system.
Solutions to Overcome These Issues
- Make sure the RAM modules are correctly installed. Refer to the step-by-step instructions provided in the upgrade process.
- If you suspect a damaged RAM module, try installing it on another laptop or test it with a RAM diagnostic tool.
- Make sure the new RAM modules are compatible with your laptop. Refer to the specifications outlined in the “Step by Step guide To check the type of RAM, voltage, and frequency using CPU-Z software” section.
Conclusion
Upgrading your laptop RAM is a relatively straightforward process that can have a significant impact on your device’s performance.
By following the steps outlined in this blog post, you can easily upgrade your laptop RAM and experience faster and smoother performance.
It’s important to take safety precautions and follow the instructions carefully to avoid any damage to your laptop or the new RAM modules.
Additionally, make sure you have the correct RAM specifications and compatibility before purchasing the new modules.
If you encounter any issues during the upgrade process, refer to the troubleshooting section for solutions.
If you’re still unsure about the process, it’s recommended to seek the help of a professional or consult the manufacturer’s support.
In conclusion, upgrading your laptop RAM is a cost-effective way to improve performance and enhance your overall user experience.
By following the steps outlined in this blog post, you can ensure a smooth and successful upgrade.

