IMPORTANT NOTE BEFORE YOU CONTINUE!
Certain notebooks and laptops, including those with core M, Intel Atom, and Intel Celeron processors (such as the core m3-7Y30), are designed to be fanless.
As a result, you won’t find any intake or exhaust grills, and you don’t have to worry about cleaning your laptop fan because there isn’t one. You can easily determine whether your laptop has a fan or not by referring to the manual or searching online.
To see a comprehensive list of fanless processors, a quick Google search will provide the necessary information. So, sit back, relax, and enjoy the quietness of your fanless laptop.
If you’re certain that your laptop has a fan, please continue reading the guide for further instructions.
Introduction
Laptop fans are an essential component in keeping your computer cool and preventing it from overheating. Dust and dirt can accumulate in the fan blades, causing the fan to spin less efficiently and resulting in your laptop overheating.
Cleaning your laptop fan is a quick and easy DIY solution that will help keep your computer running cool and prevent any potential damage from overheating.
Cleaning your laptop fan is a simple task that only takes a few minutes to complete but can make a big difference in how well your computer runs. By keeping your fan clean, you’ll help prolong its life and prevent any potential damage from overheating.
Why it’s important to clean the fan
Your laptop fan plays a crucial role in keeping your device cool and preventing overheating. The fan helps to circulate air through the device, keeping the internal components at a safe temperature.
Over time, however, the fan can become clogged with dust, dirt, and other debris, which can obstruct the flow of air and cause the fan to work less efficiently.
The laptop’s CPU and GPU run hot when used for a longer period and they need cooling to function properly. If your fan does not cool your processor and graphics card properly then your CPU will limit its performance to maintain the temperature. Moreover, your processor and graphics card might get damaged if it runs too long at a high temperature.
That’s why it’s essential to regularly clean your laptop fan to maintain its efficiency and ensure that it’s working correctly. In this blog post, we’ll guide you through the process of cleaning your laptop fan, with quick and easy DIY solutions that you can do at home.
How do I know if my laptop fan is dirty?
If your laptop is running hotter than usual or the fan is making loud or strange noises, it might be time to clean your fan. A dirty fan can cause your laptop to overheat, which can lead to performance issues or even damage your computer.
Here are a few signs that it might be time to clean your laptop fan:
Your laptop is running hot
If your laptop feels like it’s on fire, chances are the fan is filled with dust and dirt. Cleaning the fan will help reduce the heat and keep your computer running cooler.
The fan is making strange noises
If you hear rattling, buzzing, or grinding noises coming from your laptop, it’s a good indication that the fan needs to be cleaned.
Your computer is lagging
If your computer seems to be running slower than usual, it could be because the fan isn’t able to cool the system properly. This can lead to decreased performance and increased CPU usage.
The battery life has decreased significantly
Dust can build up on the battery contacts and prevent proper charging. This can shorten the lifespan of your battery and decrease its overall capacity.
Benefits of Cleaning a Laptop Fan
Regularly cleaning your laptop fan has several benefits. For one, it can help extend the life of your laptop by preventing dust and dirt from buildup and clogging the fan blades.
This also helps improve airflow and keeps your laptop running cooler and more efficiently. Additionally, it can also help improve the overall performance of your laptop by keeping the internal components clean.
What Is Required to Clean a Laptop Fan?


To clean a laptop fan, you will need:
- A can of compressed air
- A Phillips head screwdriver
- Pry tools
- Microfiber cloth
- Soft paintbrush
- Cotton swab
- Rubbing alcohol (optional)
Clean a Laptop Fan Without Opening the Laptop (using compressed air)
1. Shutdown the laptop and remove the battery
Turn off the laptop and unplug it from the power source. Unscrew and remove the battery pack if possible. Remove any other components, like memory cards or USB drives. If your laptop has a built-in battery then leave it as it is.
2. Look for the fan intake vent

The fan intake vent is the opening on your laptop where the air flows inside. You might also see it referred to as the vent. It usually resides on the underside of your laptop but can be found in other areas, too. Please refer to your specific laptop manual or search the internet if you can’t find the air intake vent for your laptop.
3. Use compressed air to clean the vents
WARNING!
It’s important to note that some laptops have speakers located on the bottom side, so be cautious when using compressed air to clean the laptop fan. Avoid blowing compressed air into the speaker grill, as it may damage the speaker.
Put the laptop on its side and use compressed air from the can to gently blow air into the vent, but do not push deep inside it. Hold the nozzle about two inches away from the vent to avoid damaging any of the components. Do this for each vent on your laptop (take care not to block any of them while you’re cleaning).
4. Blow the air through exhaust vents if possible


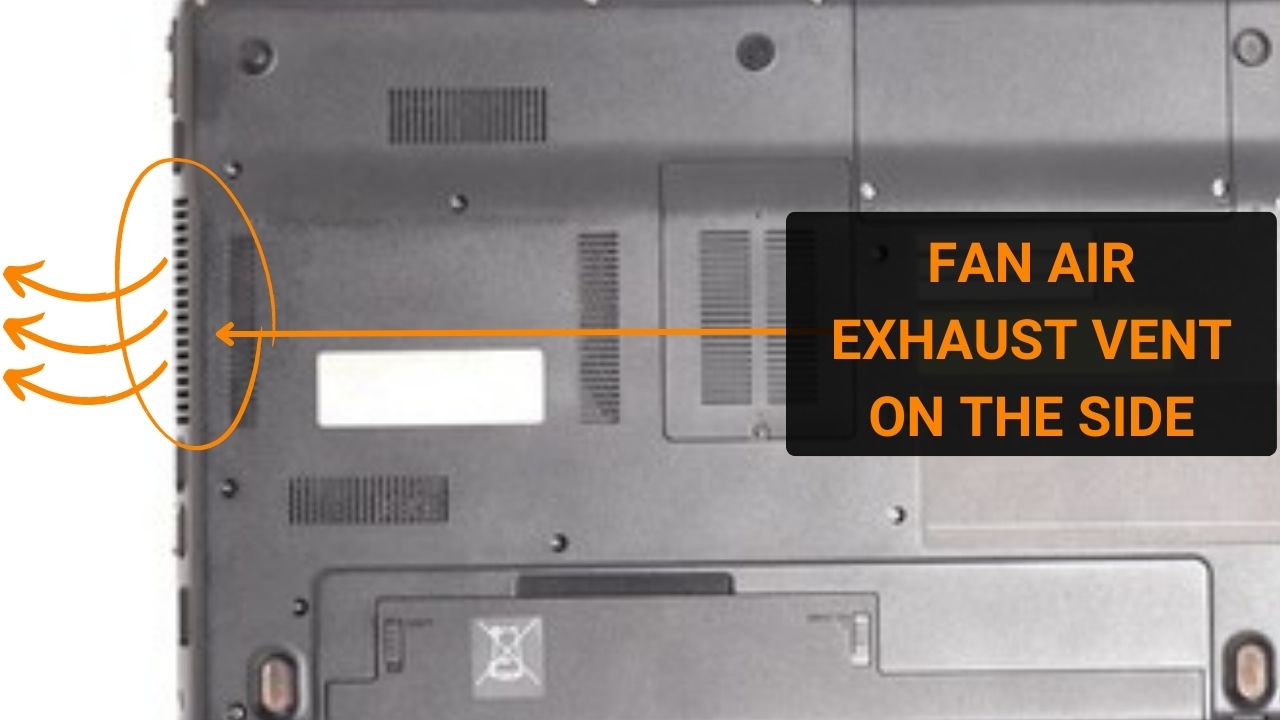
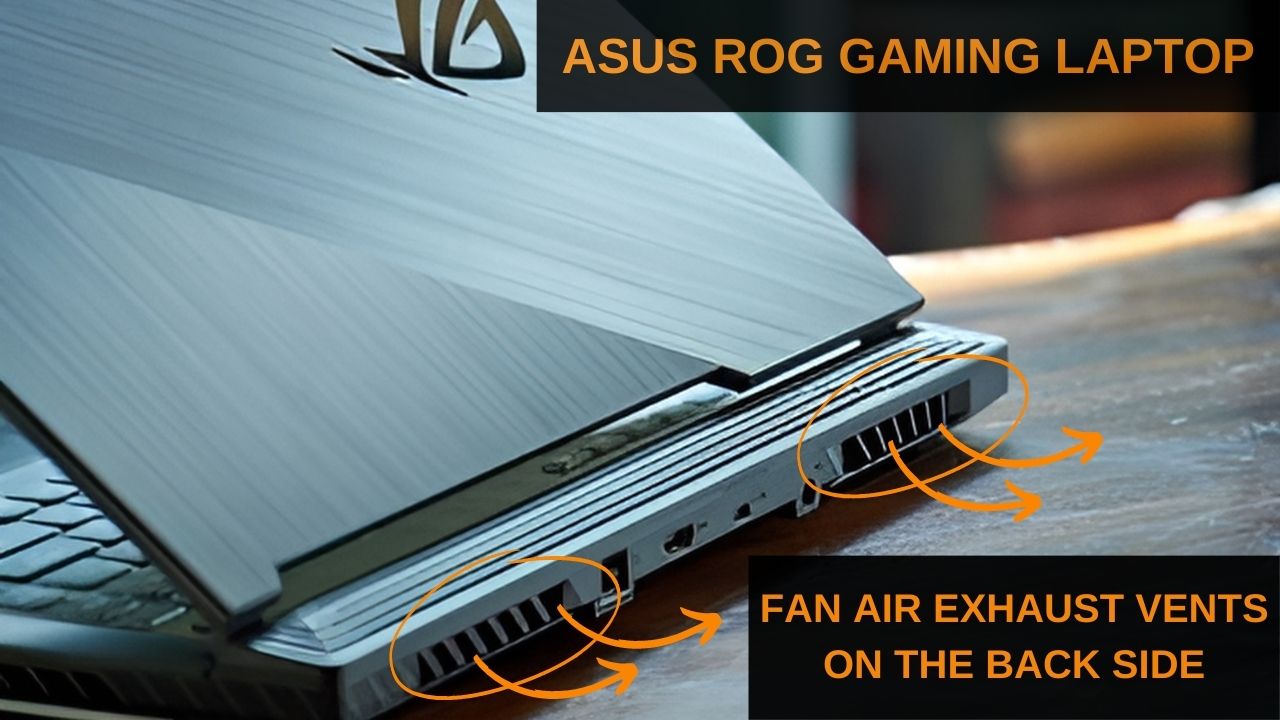
Blow compressed air through the exhaust vents as well to help push out dirt and dust. If your laptop has vents on the bottom, blow it from the outside of the laptop towards the inside. They are located particularly on the sides of the laptop but gaming laptops have exhaust vents on the back side of the laptop as well.
Clean a Laptop Fan by Opening the Laptop
WARNING!
Do not open or disassemble your laptop if it is under warranty
1. Shutdown the laptop and remove the battery
Shut down the laptop, remove the battery, and unplug it from the power source. If your laptop has a built-in battery then you can leave it as it is.
2. Open the laptop
If you are not sure how to disassemble your laptop then use ifixit to find a teardown guide for your laptop.
Locate the screws on the underside of the laptop and remove them. You may need a small Phillips head screwdriver for this part. Be careful not to strip any screws with too much force. Use a plastic pry tool to snap out the back cover and look for any ribbon cable attached. Try not to damage it and remove it if possible.
3. Use a microfiber cloth to clean the fan
Remove the upper cover of the laptop fan using a Phillips head screwdriver and take a microfiber cloth to clean the complete fan and its blades. Hold the blades of the fans gently while cleaning them so that you can wipe them easily.
4. Use a soft paintbrush to wipe off the dust from the blades.
If you don’t have microfiber cloth at home you can also use a soft paintbrush or a cotton swab to clean the blades of the fan. This way you can reach more area of the fan than a cloth.
5. Clean the air vents
Use a soft paintbrush or a cotton swab to brush off the dust and check the air intake vents located at the bottom panel of the laptop along with the air exhaust vents that are located on the side of the laptop.
6. Assemble the laptop back and tighten the screws
Don’t forget to attach the upper cover of the laptop fan. Reattach the ribbon cables, put back the bottom panel, and tighten all the screws. Reinsert the battery and turn on the laptop to make sure everything is working fine.
How to clean a laptop fan using a vacuum cleaner
Using a vacuum cleaner to clean a laptop fan is one of the easiest methods. You can use it if you do not have compressed air available in your home. However, it’s important to use the right setting to avoid damaging the internal components.
Here’s how to do it:
Step 1: Turn off your laptop and unplug it from the power source. Remove the battery and put it aside.
Step 2: Get a small nozzle attachment for your vacuum cleaner. This will help you to reach the fan without causing any damage to the surrounding components.
Step 3: Hold your laptop upside down to allow the dust and debris to fall off from the fan area.
Step 4: Locate the fan intake as mentioned in the above steps and use the nozzle attachment of the vacuum cleaner to suction off the remaining dirt from the fan. You can also use a brush attachment to loosen the dust.
Step 5: Once you have finished vacuuming the fan area, reconnect the battery and turn on your laptop to check if it’s running smoothly.
Remember to be gentle while cleaning the fan. Avoid applying too much pressure, and make sure not to touch any other parts inside your laptop.
Cleaning your laptop fan is an essential maintenance task that should be done regularly. By following these simple steps, you can easily and quickly clean your laptop fan without spending a lot of money or effort.
Common Mistakes When Cleaning a Laptop Fan
One of the most common mistakes people make when cleaning a laptop fan is spraying the fan directly with cleaner. This can damage the fan and cause it to become less effective. Instead, spray a towel with cleaner and then wipe down the blades of the fan. Another mistake is using a vacuum cleaner to clean the fan.
The second mistake to avoid is blowing a fan with compressed air directly as the fan will rotate at a speed greater than at which it is designed hence you can damage your fan motor. So, always use compressed air at an angle or indirectly while cleaning the fan.
Laptop fan cleaning kit
If you want to ensure that you have everything you need to clean your laptop fan, investing in a laptop fan cleaning kit is a great idea. These kits are specifically designed to make the process of cleaning your fan quick, easy, and efficient.
Typically, these kits will come with a range of tools and accessories that are designed to help you get into all the nooks and crannies of your laptop fan. Some common tools that you may find in a laptop fan cleaning kit include a small brush, a microfiber cloth, and some cleaning solutions.
By using a kit like this, you can rest assured that you have everything you need to give your laptop fan a deep clean, and you can also feel confident that you won’t accidentally damage any of the sensitive components inside your machine.
Of course, you can always make your own laptop fan cleaning kit by picking up some basic tools and accessories from your local hardware or electronics store. However, if you’re looking for convenience and ease of use, a pre-made kit may be your best option.
No matter which route you choose to go, having the right tools and accessories is crucial when it comes to cleaning your laptop fan. So don’t skimp on this step if you want to keep your machine running smoothly for years to come!
Frequently Asked Questions (FAQs)
Q. Can I clean my laptop fan with a hair dryer?
Using a hair dryer to clean a laptop fan may seem like a quick and easy solution, but it’s not the most effective method. While the hair dryer can blow away the dust and debris, it may not remove all the dirt particles from the fan blades or inside the laptop.
Additionally, the heat from the hair dryer can cause damage to the delicate internal components of the laptop. It can cause static electricity buildup that could damage the motherboard or other sensitive parts.
Overall, using a hair dryer is not recommended for cleaning a laptop fan. It’s better to stick with the recommended methods, such as using a vacuum cleaner or a laptop fan cleaning kit. These methods are more efficient, safe, and will effectively remove dirt and debris from your laptop fan.and
Q. Can you clean the laptop fan with compressed air?
Yes, you can use compressed air to clean a laptop fan. We have discussed in detail how to clean a laptop fan using the compressed air above.
Q. How to clean a laptop fan with a straw?
Using a straw to clean your laptop fan might sound strange, but it’s an effective method that doesn’t require any special tools. Here’s how to do it:
1. Shut down your laptop and unplug it from the power source.
2. Use a small screwdriver or plastic opening tool to remove the bottom cover of your laptop. If you want you can follow the below steps without opening your laptop. (Note: if your laptop is under warranty do not open it)
3. Locate the fan and use your fingers to hold it in place. Be careful not to touch the blades as they are fragile and could break.
4. Use a straw to blow air into the fan vent, directing the airflow towards the blades. This will dislodge any dust or debris that has accumulated inside the fan.
5. You can also use a straw to suck up any debris that has been dislodged from the fan, making sure not to touch the blades or other components.
6. Repeat this process a few times until the fan is clean.
7. Once you’re done, replace the bottom cover of your laptop and turn it back on.
It’s important to note that while using a straw is a simple and affordable way to clean your laptop fan, it may not be as effective as using a vacuum cleaner or compressed air. Also, be gentle when handling your laptop components and make sure to ground yourself to prevent static electricity damage.
More Cleaning Guides
We have additional cleaning guides that may be useful if you are looking to clean your laptop screen or keyboard.
Conclusion
If your fan is still running at high speed at all times without speed then your PC could be overheating. We recommend you follow the detailed guide to fix overheating of your laptop.
Cleaning your laptop fan doesn’t have to be a daunting task. With the simple steps outlined in this post, you can quickly and easily clean your laptop fan, keeping your device running smoothly and avoiding overheating.
If you have any other questions about cleaning your laptop fan or want to share your own tips, feel free to leave a comment below. Happy cleaning!


